4 Preparing for Ultrasound Scan, Basic Image Acquisition
Mohammad Firdaus Bolong
Introduction
Acquiring and interpreting an image is one of the most enjoyable part in an ultrasound scan. The achievement of getting a diagnosis or findings that helps pointing towards a diagnosis is unbridled.
In this small chapter we’ll bring you step by step on how to prepare you and the patient for your first ever ultrasound scan.
Setting up the patient
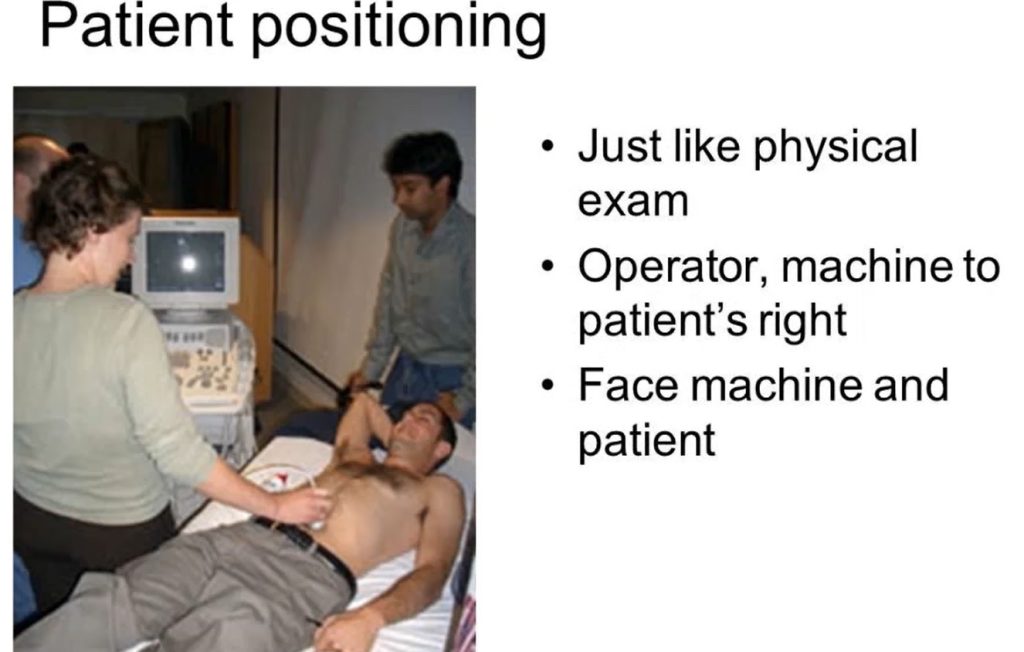
A patient should always be at the most comfortable position possible when undergoing an ultrasound scan. Preferably the patient should be at a semi-recumbent position at 45 degree angle and be approached from the right side as in any physical examination.
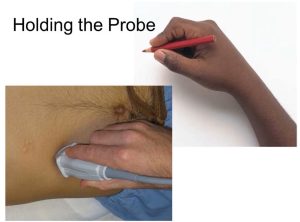
Holding the Probe
It is highly recommended to hold an ultrasound probe as if you’re holding a pencil. It will give a good stability and also grip on the ultrasound probe, as well as the needed coordination when moving and manipulating a probe.
Stabilisation of the probe during scanning can be achieved by leaning your heel of hand or your 5th finger onto the patient’s body. This will allow you to make minute movements in order to attain best window for your scan.
Adequate amount of gel is needed to assist in moving the transducer along any specific planes and also to optimize the window and quality of image. This is because the gel will become the medium between the transducer and the tissue or surface being scanned, making sure that the ultrasound waves being reflected will not dissipate, which will decrease the quality of image.
Adopted from “01 Physics” by SinaiEMUltrasound is licensed under CC BY 4.0
Image Acquisition
It is important to be well oriented to the types of basic ultrasound probe movement and orientation.
Screen markers are usually on the right side of the screen and tallies with right side of the patient.
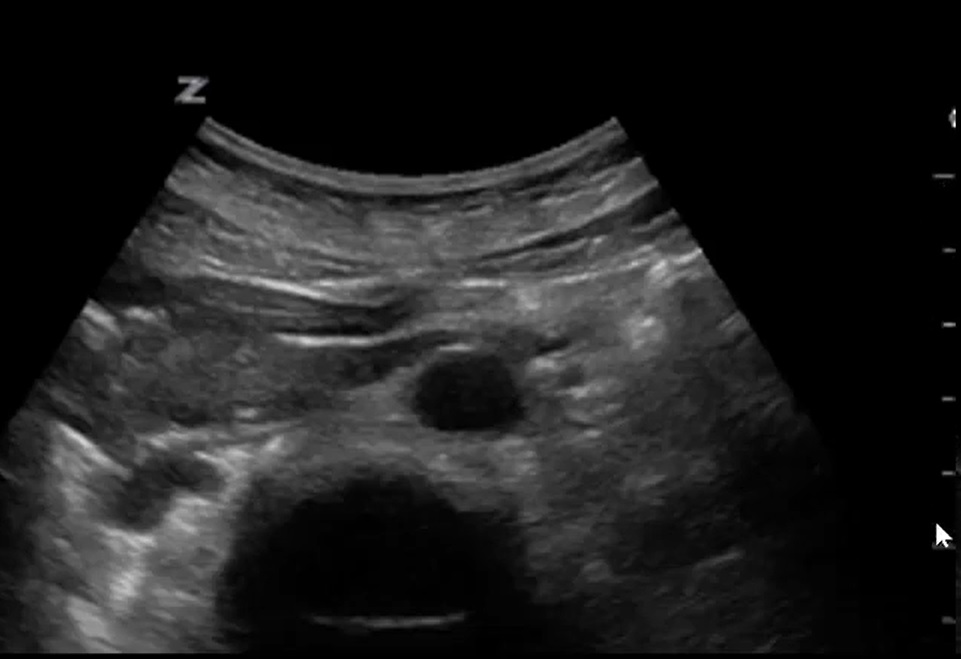
Abdominal Ultrasound screen capture showing screen indicator on the right side which tally with probe marker on the right side of the patient, thus orientating the Abdominal aorta on the left side and inferior vena cava on the right. Adapted from “POCUS Cases 10: Accuracy, Limitation & Pitfalls of POCUS for AAA” by EM Cases is licensed under CC BY 4.0
Other than that, there are several basic movements of the ultrasound probe that you or any ultrasound operator needs to master in order to get the best out of these state of the art tool.
- Plane Orientation: Start with standard planes—longitudinal and transverse. These are fundamental for comparing anatomy and pathology.
- Sweeping and sliding: Slowly sweep the transducer vertically or parallel to the skin across the area of interest to explore the anatomy comprehensively. Usually this is done without any added pressure or movement horizontally. If you are moving the transducer vertically sideways, the movement on the other hand is called sliding
- Compression : Is the movement of the transducer towards the patient’s body, all the time making sure that the transducer is fixed at the same angle horizontally
- Tilting, Rocking and Rotating: Adjust the angle of the probe to optimize the image quality, especially when structures are obscured by bone or gas.
The video shows basic orientation of probes and monitor as well as basic movements of transducers during any types of scan. Adapted from “Ultrasound: How to Scan” by Radiology Frameworks is licensed under CC BY 4.0
Making Sense of a Formed Image
The first challenge of any scan is to obtain a satisfactory image to form a diagnosis. Surely surface anatomy plays an important role for you to ensure correct placement of the probe with the help of anatomical landmarks in order to get a beautiful image that everybody can make sense of.
Placing the probe on the right place is only half the battle. Getting a sharp image and qualified picture to make sure of a finding is the next part of it. It is therefore important to make the most out of multiple settings available to you.
Multiple settings on how to adjust the formed image is discussed briefly in the previous chapter of this book.
Scanning modes
Basically there are 3 types of ultrasound modes, of which 2 still applies heavily to the aim and application of this book.
A mode or Amplitude mode uses amplitude return on an oscilloscope display and now mainly used in opthalmology.
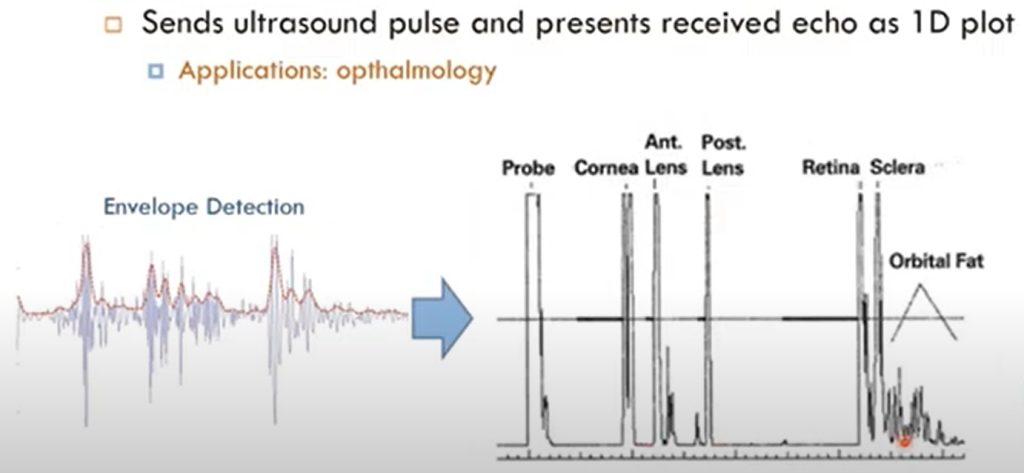
A Mode in Ultrasound Adapted from “Short Topics in Ultrasound Imaging: Basic Imaging Modes (Arabic Narration)” by Biomedical Engineering is licensed under CC BY 4.0
B mode or Brightness mode is the majority of use these days and used for diagnostic imaging. It is a 2 dimensional image that displays brightness on the screen due to the effect of waves travelling to and from the objects being scanned.

B mode in Ultrasound Adapted from “Short Topics in Ultrasound Imaging: Basic Imaging Modes (Arabic Narration)” by Biomedical Engineering is licensed under CC BY 4.0
M mode or Motion mode is a mode that capture motion, mainly along a single line in a 2D image. This mode is usually reserved for advanced users and is very important for quantitative measurements.
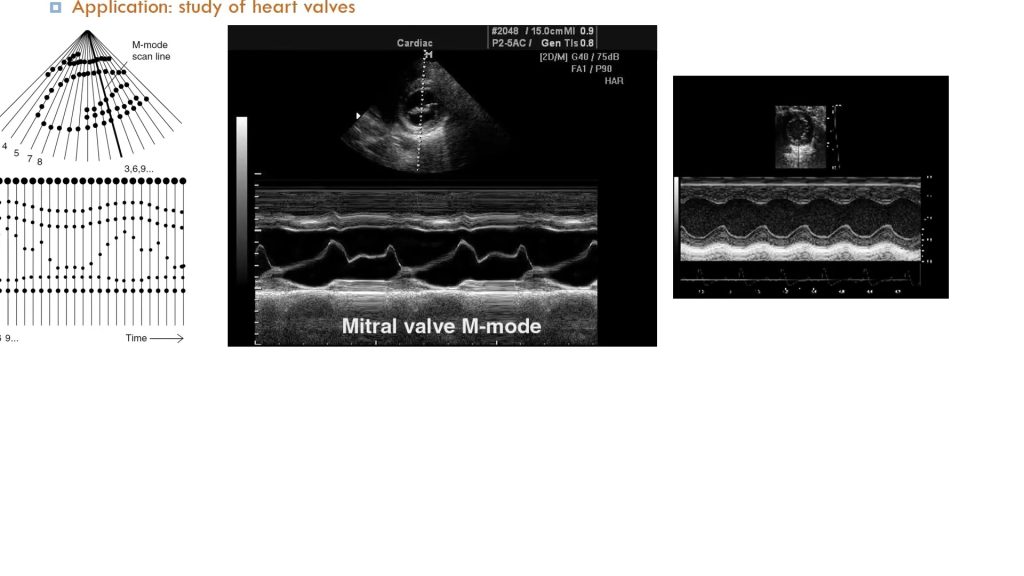
M Mode in Ultrasound Adapted from “Short Topics in Ultrasound Imaging: Basic Imaging Modes (Arabic Narration)” by Biomedical Engineering is licensed under CC BY 4.0
Preparing for Ultrasound Scan, Basic Image Acquisition
